
MAME Arcade Cabinet Conversion
Part 0: Monitor
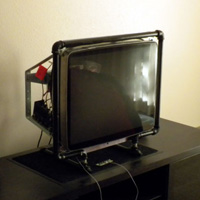
So I bought a Wells-Gardner D9800 arcade monitor, rigged up an industrial looking frame for it and used it as my primary "television" for a while. It looked pretty cool and since it's a tri-sync monitor, it let me play emulated NES games at their original low resolution and play gamecube games in 640x480 progressive scan.
However, there were problems.
I couldn't get anything other than my PC and gamecube hooked up to the thing. I built RGB cables for both my SNES and PS2 but I had extreme difficulty reconciling the horizontal/vertical/composite sync signals and couldn't a stable picture out of them. On top of that, the geometry and convergence on the monitor was perpetually wonky and there appeared to be a defective dark spot right near the middle of the tube. After I purchased this monitor, I read all sorts of posts online about how the quality control at Wells-Gardner had completely gone to shit. They no longer make any CRT products.
It was kind of depressing, so the monitor sat on the floor as a monument to the failures of myself and all man kind for several years before I decided to go for a full cabinet.
Part 1: Cabinet Acquisition

Transportation was another matter. I returned to craigs list and found someone who would help me move it for another $150. Now I suppose you could use your "friends" or whatever to help you move something like this, but it was an hour+ drive each way and the machine weighs ~450 lbs. It is not a small amount of labor to move it.
Key features of this cabinet:
- Late model game - Made in 1998. So I'm not ruining a classic (or paying for one).
- Reclined monitor - So you can actually see the screen. Some older cabinets have bolt upright monitors that expect you to be 4ft tall.
- Straight forward design - No wasted space around the monitor or weird features.
- Fits a large monitor - Specifically the trisync monitor I already had.
- Flat control panel - Can easily be replaced with a slab of whatever you want and doesn't need a precision fit.
- 4 Player control panel - Plenty of room for extra controls.
- High quality cabinet - It's not just a wooden box, there's sheet metal construction on the entire front and back corners. Beyond what I could build from scratch or from a kit.
- Fits through a standard doorway - The control panel box comes off and the marquee folds down. The people I bought it from did not know either of these things and transportation would have been much more difficult without these features.
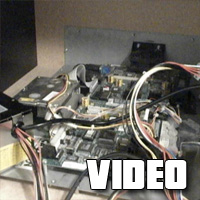
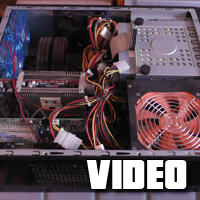
Part 2a: Power Supply Autopsy
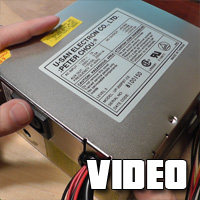
I found the machine was haphazardly wired up with two power supplies - one for the monitor and one for the the game. Upon investigation, it looked like the original power supply had blown out due to a fan failure and a second power supply was put in for the game. The first power supply was kept just as a mains pass through for the monitor. Improper grounding between the power supplies probably lead to the erratic behavior.
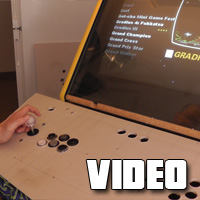
Part 2b: Gauntlet Lives
I followed this tutorial (local mirror here) to copy my now-totally-legit gauntlet .chd file from my rom collection to an old ide hard drive I had and the game was up and running within minutes.
Part 3: Buttons
Part 4: Bezel Replacement

Unfortunately emachineshop's pricing on acrylic is crazy - like I seriously think someone put a decimal point in the wrong place - so I exported to autocad format and had the piece cut locally.
Arcade-Bezel.ems
Arcade-Bezel.dxf
Part 5: The PC
All you really need is a leftover piece of plywood and some drawer hardware.
Part 6: Lock Repair

2x First Watch Security 7/8 in. Stainless Steel (for the coin doors)
1x First Watch Security 1-1/8 in. Chrome (for the rear door)
If you look closely, the first watch security locks have model numbers like "1384-601" - the "601" part is the key type. Match those numbers up and you can get different depth locks that all use the same key.
Part 7: Control Panel Prototype
Part 8: Aluminum Control Panel
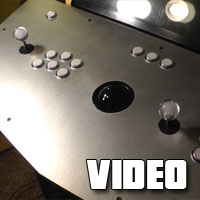
The final design is five 1/16" sheets sandwitched between two 1/4" plates. I'm actually quite pleased with this method of construction. It's all 2D parts, so fabrication is relatively cheap (something like ~$600 delivered) and the plates make it super solid.
Here are the emachineshop files:
Arcade-Panel-16-mid.ems
Arcade-Panel-16-tops.ems
If you use these you owe me big time because producing them was a lot of work.
Part Blargh: Laziness
At this point, the task of editing videos started to interfere with my desire to continue the project. I recorded videos for the remaining parts, but I have not edited them.
Though the project is complete, the writeup is a work in progress.
Though the project is complete, the writeup is a work in progress.
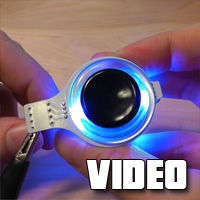
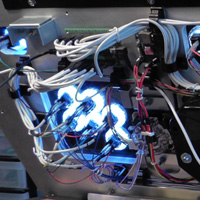
Part ?: Lighting
Video Eventually?
I have programmable RGB lighting in the trackball, joysticks, and the buttons. This involved many parts and modifications.Trackball
1x U-Trak Trackball
1x Contact Juggling Ball (Acrylic, CLEAR, 76mm)
1x Cast Acrylic Sheet (White-Bright, Translucent)
1x Hygloss Mirror Boards
Joysticks
2x Sanwa JLF Joysticks
3x Joystick Bubble Tops (manually drilled out)
2x Hollow Joystick Shafts
2x Slip Rings
5x Surface mount RGB LEDs
Buttons
20x Seimitsu 30mm screw in buttons
20x Uila S Flash LED Modules
Miscellaneous
1x PacLED64
50x 0.100" (2.54 mm) Female Header: 1x2-Pin, Straight
50x 0.100" (2.54 mm) Female Header: 1x4-Pin, Straight
10x 0.100" (2.54 mm) Breakaway Male Header: 1x40-Pin, Straight
01x 0.100" (2.54 mm) Breakaway Male Header: 1x40-Pin, Right Angle
Part ?: Control Panel Assembly
Sure enough, a mere 12 years later, they were the perfect thing to wire up my arcade cabinet. Pliable, high quality, 4-conductor wire is just what you need for all those RGB LEDs.
Part ?: Software
Let me explain.. no there is too much, let me sum up:
- Nlite to make a stripped down version of Windows XP.
- Soft15khz to get my video card to output the super low resolutions required for old games. This was actually somewhat of a nightmare since there is a hard limit to the number of resolutions you can have and some of them seem to require completely different geometry adjustments on the monitor itself. I ended up doing a bunch of tedious manual tweaks to the timings to resize things.
- I have my own emulator front end called RomShelf. I added support for PACLED64 to it using their sdk. I guess I will release this at some point? Does anyone care?
-
Changes to MAME (Compiled using MinGW)
- Remove nag screens
- Extended high score saving patch
- Always render square pixels, never stretch
- Tweaks to resolution matching for vertical games
- Don't clear NVRAM after loading a save state. This lets me use savestates to skip the boot up process for many games, yet still keep my high scores
Part ?: Audio Panel
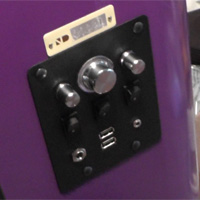
LP-2020A+ Lepai Mini Amplifier
I took the guts out, desoldered all the the potentiometers and designed a panel for them that fit right into the dollar bill feed panel on the front of the machine. I replaced the switches with 3 new ones from digikey, in retrospect I should have replaced the pots as well because the existing ones are super cheap and prone to fritzing out under lateral pressure. Here's the emachineshop file for the audio panel: Audio-Panel-03.ems
Note that the usb ports I used were just some that I had laying around, you'll have to modify the design to suit your own parts.
Part ?: Offloading
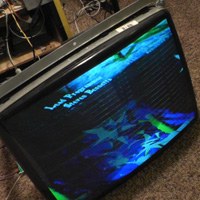
Unfortunately, after sitting for several months the monitor developed more faults and lost image stability. Replacing the cap did nothing. I sold it on craig's list for $20. Guy said he had a replacement harness (the electronics portion) for it. Hope it worked out.
TODO: Cabinet Artwork
I'd like to replace the marquee with something custom but I'm not sure what. I could draw something and get it printed on a transparent sheet, but I've also thought about using several layers of laser cut acrylic to produce a simpler design with a heftier feel.
Replacing the side vinyl would be a lot more work and I'm not sure I can come up with something better than glorious 90's crap CGI people.
Replacing the side vinyl would be a lot more work and I'm not sure I can come up with something better than glorious 90's crap CGI people.
TODO: Multifunction
I'd like to be able to easily switch between the original Gauntlet game and the MAME PC.
TODO: Keychain
The machine has keys to get into it, and they need the perfect keychain! This is critical.
Part $: Cost
What was the total cost of this machine you ask? I actually kept all the reciepts so that I could remember where I bought stuff, might be fun to compile a complete price list but not fun enough for me to do it right this minute. The answer is a lot. Easily over $2000. But then again I went all out with LED lighting, a new monitor and CNC parts. If you used a tv for the monitor, used cheaper buttons, and built the control panel yourself (assuming you already have the skills and tools), you might be able to get away with only spending $500-$800.
Results
[Pictures of the finished product go here]
Comments

Slo2017-02-03 19:50:16
Have you given up or forgotten about finishing the writeup? because i saw that you started a new project. I am very curious to see the result of this project.